We’re kicking off 2022 with a major revamp to the Incoming Calls section, bringing it in line with the look and feel of our newer pages. In addition to new user interface updates, read this guide to discover brand new features and learn how to use them.
Incoming Calls front page
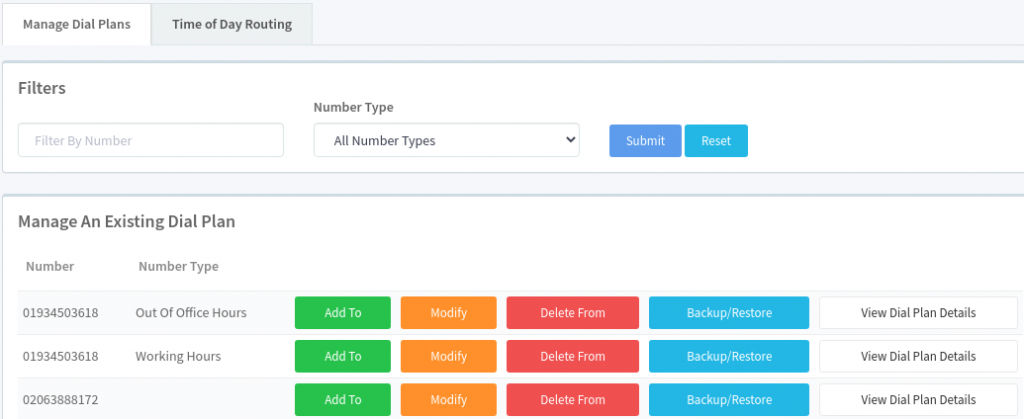
To improve our user experience, we have decluttered the page by removing the redundant tabs for Add To, Modify and Delete – now, all actions are performed using the buttons and you remain on the same page throughout.

Filter your list of numbers
The new filter box lets you search for full numbers or parts of numbers (e.g. area codes). You can also filter by Number Type, i.e. Working Hours or Out of Office Hours.

New and updated action buttons
Clicking any of the action buttons will no longer redirect you to another page, instead, the forms are loaded directly underneath the Manage An Existing Dial Plan table.
![]()
In addition to the regular Add To, Modify and Delete From buttons, two new buttons exist: Backup/Restore and View Dial Plan Details.
Backup or Restore your dial plans
Clicking Backup/Restore gives you the option to save and name a new backup of the existing dial plan, or overwrite it using an existing backup.

View your dial plan
Clicking View Dial Plan Details opens the dial plan contents in the Existing Dial Plan Content section. This section has had a complete overhaul which we describe in detail in the next section of this post.
Viewing your dial plan contents
Dial plan content is split into three sections:
- Main Dial Plan
- IVR Options
- Error Handling

Main Dial Plan is where calls start, IVR Options can be added as usual and Error Handling includes ‘Timeout’ and ‘Invalid’ for when callers do not select an option or select the wrong option, respectively. Individual sections can be collapsed/expanded to improve visibility.
Clearer terminology
After listening to user feedback, terminology deemed confusing was replaced:
| Old | New |
| Extension | Option (IVR Options), Type (Error Handling) |
| Start | Main |
| Priority | Priority Order |
| Application | Feature |
| Application Data | Details |
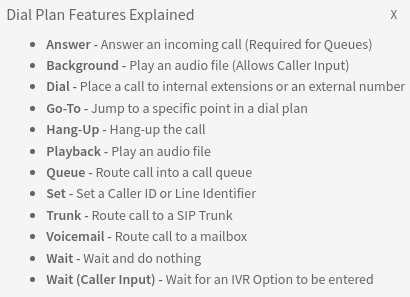
Dial Plan Features explained
To help users read dial plans, descriptions were added for all main Dial Plan Features. The descriptions can be found in the Existing Dial Plan Contents section and in the Add To/Modify dial plan forms.

Improved options for Features
Our improved options let you upload files without having to leave the page, and add services that don’t exist yet.
Background, Playback, and Announcement to Recipient
If no sound files exist on your account, you can upload a file using the Add To form by clicking the blue File button.

For an Announcement to Recipient, select the Upload A Sound File radio button.

Duration input
All duration inputs (e.g. Ringing time, Wait time) support HH:MM:SS format, and an option for Unlimited Time:

Add a service if it doesn’t exist
If a service your feature relies on does not exist, the option to add it is provided. Note you will be redirected to the relevant service’s Metis page.
- Dial (Add An Extension)
- Queues (Add A Queue)
- Trunk (Add A Trunk)
- Voicemail (Add A Voicemail)
For example, if you attempt to add a Dial Step using extensions but no extensions exist, the submit button is replaced with Add An Extension.

Add To dial plan
The Add To form was restructured to greatly improve the user experience.
In this example, you can see the UI changes we made to make this page easier to use (e.g. radio buttons instead of dropdowns, new duration inputs, tooltips, and more).

Modify dial plan
Clicking Modify loads the dial plan and displays orange Pencil icons beside every modifiable row. Clicking a Pencil icon will load the Modify form pre-populated with Selection Option, Priority Order and Feature.
For example, when the user clicks Modify and clicks Priority 4:

Then the Modify form appears, and the Feature and its details can be updated.

Delete From dial plan
Clicking Delete From loads the dial plan and displays red Bin icons beside every row you can delete. Clicking a Bin icon loads the delete form pre-populated with the row’s details.

Try it out yourself
The best way to learn is to try it yourself. Head over to https://mymetis.co.uk/ and click on Incoming Calls to get started.
The PDF version of this guide can be downloaded by clicking here.
Our knowledgeable support team can be contacted by email at voip@pack-net.co.uk, by telephone on 01616602350 opt. 1 and using Online Chat by clicking the Chat icon found in the bottom-right of Metis.


